
Executive Summary. Learn here the what-not-to-dos of rebar installation. Some photos of fails here will certainly affect your pour schedule – and they’re so easy to avoid with conscientious workers and timely inspection.
The basic fails. What rodbusters do is pretty impressive. Not only is the bar heavy (it’s solid steel), but it has to be arranged in perfect geometric patterns. Here are the top problems I see in rebar installation (from an inspector’s viewpoint):
-
- Clearance – rebar is designed to be so many inches away from the surface of the concrete for two main reasons: (1) to properly serve its structural purpose and (2) to prevent corrosion of the bar from water or chemical intrusion. Assuming you’ve formed to the correct concrete dimensions, you then have to make sure the rebar has proper clearance from those surfaces, as listed below:
- Top – on smaller pours this can be eyeballed into place. On larger and more critical pours (warehouse slabs or bridge decks) it may take stringlines, finishing machines, and lasers to ensure proper clearance from the finished surface.
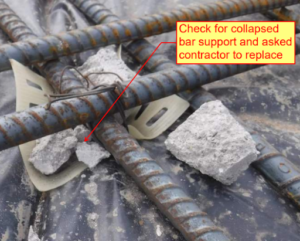
- Bottom – it’s all about dobies here. Whatever blocks or chairs you choose, ensure that the surface you’re putting them on will not deflect thereby allowing the rebar to ‘settle’ and be too close to the subgrade in between the supports.
- Sides – again, bolsters and chairs properly spaced do the trick and make for easy inspection. These spacing tools ensure a fixed, premeasured offset of the bar from the formed surface.
- Tie wire housekeeping – there are two issues here. The first is just picking up all those small pieces of tie wire that are left behind during the tying process. Blow them out, remove them by hand, or use a rolling magnet. Second is the tie wire left in place which infringes upon the clearance as discussed in the previous bullet. Lots of times the tie wire pushes against the side form during the pour and then upon stripping of the forms the wire is at the surface and can rust and/or provide a conduit for water intrusion. This is a simple fix during the installation – just push back the wire away from the final surface.
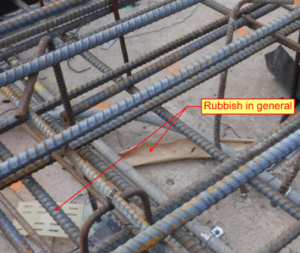
- Trash in the forms – this is a ‘pride of work’ thing and a dirty pour area says to an inspector that ‘if the rodbusters are fine with leaving all that trash in the forms, the bar must be all screwed up – I’ll start looking harder.’
- Spacing – thirty-one bars at 8” spacing isn’t going to be perfect, but across the 20’ it spans, it ought to at least have the right number of bars in place and look good to the naked eye. Read the plans, ensure the spacing is understood, and expect some spot measuring by the inspector. If it looks good, you’re probably going to be ok with the inspector.
- Clearance – rebar is designed to be so many inches away from the surface of the concrete for two main reasons: (1) to properly serve its structural purpose and (2) to prevent corrosion of the bar from water or chemical intrusion. Assuming you’ve formed to the correct concrete dimensions, you then have to make sure the rebar has proper clearance from those surfaces, as listed below:
- Tie requirements – most specifications will require a percentage of ties. In other words, 50% tied or 100% tied, et cetera. This is a count of the intersections of all the bars and what percentage of those intersections are required to be tied.
I’m from Missouri. Show me. Below are some what-not-to-do sample photos which help illustrate the items discussed above.
 |
REBAR CLEARANCE (SIDE) TOP VIEW INTO WALL FORMS Grey rebar spacer (wheel) is in place which is good, but rebar hook comes in above it into the supposed clear zone. |
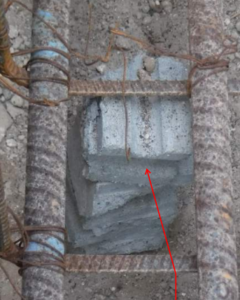 |
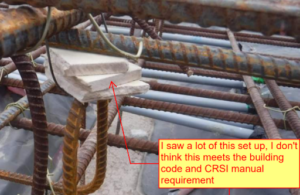
REBAR CLEARANCE (BOTTOM) TOP VIEW OF SLAB BOTTOM MAT This “dobie tower”, indicated by the red arrow, seems like a bad practice. This tower can collapse during a pour and shift the rebar. I never found a specification it violated though. |
 |
REBAR CLEARANCE (BOTTOM) CLOSE VIEW OF SLAB BOTTOM MAT This wrinkled plastic piece is a “sand plate” which is supposed to prevent settlement of the dobie into the subgrade. The rebar was too heavy and the rebar mat sank. |
 |
TRASH IN FORMS TOP VIEW INTO SLAB ON GRADE POUR There should be no trash/rubbish in the pour area. Notice tie wire, random sand plate, and paper. Trash can be removed by hand or even blown out by air compressor. |
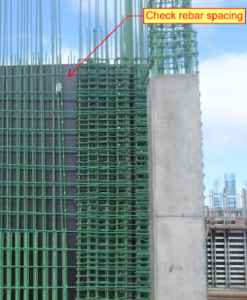 |
REBAR SPACING ELEVATION VIEW INTO WALL FORMS Rebar is not at correct spacing. Frankly, this is probably not completely tied yet; however, we may have been called in for an inspection and, well, it’s not spaced correctly. No tape measure needed! |
 |
REBAR SPACING SIDE VIEW OF TOP SLAB Spacing between top and bottom mat is too large. Either standees were misfabricated or bottom mat dobies had settled into the subgrade. |
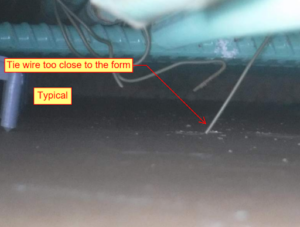 |
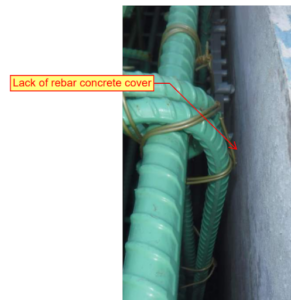
REBAR CLEARANCE TIE WIRE IS TOO CLOSE TO FINAL SURFACE Tie wire will be at the concrete surface once the forms are stripped and will not only corrode, but will provide a path for water intrusion. |
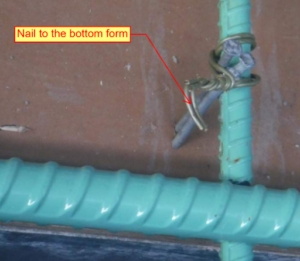 |
FORMWORK AND REBAR ERECTION FRONT VIEW OF WALL FORM Nails will be exposed once this wall form is stripped. This will rust and allow water to enter the concrete wall and cause spalling or cracking of the concrete. |
 |
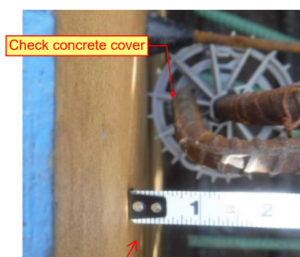
REBAR CLEARANCE EDGE OR WALL FORM Although there’s no measurement, the grey slab bolster behind the red arrow shows the required clearance. |
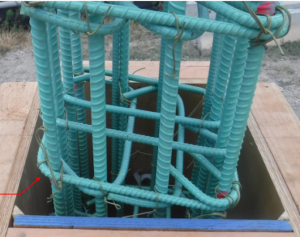 |
REBAR TWISTING COLUMN REBAR IN COLUMN FORM Rebar was not properly aligned in prior pour, and the bar continued vertically in a twisted manner. Also notice this resulted in a clearance issue in lower right at front form face. |
My story. It would take a couple days to prepare each of the bridge deck pours earlier in my career because we had to run the finishing machine over and over the surface. That’s just what it took.
These photos above are all preventable mistakes that shouldn’t need an inspector to catch. These are issues that can be caught by the rodbuster, or certainly the internal quality control team of the general contractor. When an inspector gets called to the field by the contractor and finds these mistakes over and over, it is very frustrating to both parties: the contractor and the owner. I love to see high production and schedules met and beat. Having to reject installations is a morale killer.
Work safe!


0 Comments